3D Viewing
3-D Viewers: The pages of this web site are designed for use with screen resolutions of 800x600 or greater with 16 million colors (16 to 32 bit color resolutions). Though it can be viewed at 640x480, the stereograms will not fit on the screen at that resolution. Using a screen color resolution of less than 16 bits may cause the images to be grainy looking, and results in some image degradation. I view this web site in 1024x768 in "true color 24 bit" mode on a 17" monitor, and those are probably the optimum settings to get the full benefit of the stereogram images. On a smaller monitor you will probably find the optimum screen resolution to be 800x600. I recommend a "Lorgnette" style viewer with prism lenses for casual viewing of the stereograms on screen. Berezin Stereo Photography Products has 3D Lorgnette viewers, Stock #540 for $3.00 each at the time of this writing. If you want a more sophisticated viewer that's less prone to making you "wall-eyed," try the "ViewMagic Side-by-Side" viewer Berezin offers (Stock #318, $55.00). Its quite a bit more expensive, but it presents a clearer image with less distortion, is less distance sensitive, and produces less eye strain than the Lorgnette. If your going to be spending a lot of time looking at stereograms, it can save you a wicked headache. Some people have difficulty viewing stereograms even with a lorgnette, and I've found the ViewMagic often works better for them. It uses a system of front surface mirrors to route the light from each image into each eye without any lensing effects, providing for more comfortable viewing, though holding the viewer is a bit more awkward than with a lorgnette, and you must take care to keep the mirrors clean and free of dust, fingerprints, and scratches. It is very good for use with printed images, can be used for on-screen viewing, and can be adjusted to match the spacing of your eyes. If you are going to be doing a lot of work with stereograms, it is my viewer of choice.
Un-aided Viewing of Stereograms: Yes, it is possible to view these stereograms in 3D without a viewer, but they must be printed out in good quality and fairly small, not more than about 4 inches wide. Thumbnail images of the stereograms are provided on each nuclear shell page, though these thumbnails are unsuitable for viewing, they are linked to larger images which are suitable for on-screen assisted viewing with a Lorgnette, or can be saved to your local drive and printed out in custom sizes for viewing by almost any good image editing program. Hold the printed stereogram about a foot in front of your face and attempt to view each image with a different eye. The images may start to merge into one, and I find shaking the stereogram from side-to-side slightly can help my eyes finish the job. I don't recommend doing this technique very much, especially before driving a vehicle somewhere, as it makes you kind of whaz-eyed and can give you a fierce headache if you do it too long.
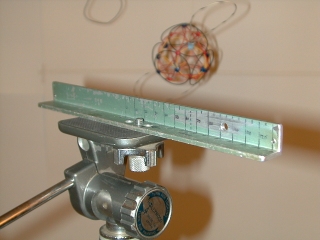
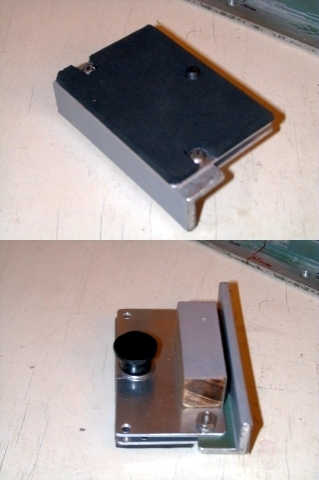
How the Images Were Recorded: I used a Nikon Coolpix 900 digital camera to record the stereograms. To facilitate capturing stereo image pairs, I constructed a female 1/4-20" threaded (standard tripod thread) slide mount for the camera from a piece of heavy right-angle aluminum stock (the slide rail) and a male 1/4-20" threaded mount for the camera, which is placed on the slide rail to precisely position the camera while keeping it parallel. The images were exposed about 12 to 18 inches from the camera, with a 30mm baseline shift between each of the two stereo images. No flash is used, as the lighting must be the same for each image or undesirable 3D effects occur with the flash shadow. The image pairs are then placed side by side in an image editor and saved as a single image. The images were then enhanced, saved as jpegs, then ported back into the image editor and resampled to their current size. A second resampling is then done to produce the .GIF files used as links to the larger JPEG images. Non-stereo images were shot on 35mm film, printed as glossies, scanned on a flatbed scanner, and many of them had the strings holding the models in place edited out in an image editor. They were then cropped and resampled to the smallest image size I could manage without losing the details.